Authenticating a React SPA towards a SAML IdP
Overview
In this tutorial we will look at how to authenticate user from a typical SPA in React using a SAML IdP, in this case ADFS. This is done using a Keycloak server to act as a broker and translate between OIDC and SAML. I will show the necessary configuration needed and as a cherry on top show you how to automate the whole setup.
The problem with SAML in SPA in browser application
“No, you can’t use SAML in a Single Page Application.”
“SAML is old. Why don’t you just change to OIDC.”
I have seen many questions on the subject and this is most often the kind of answers you find if you start looking around on how to let you users login to SAML IdP from SPAs like React or Angular.
It is true that you can't use SAML directly from the SPA running in the browser. This is because SAML relies heavily on public/private key pairs of the parties involved to do message signing and encryption and a SPA in the browser can not give the protection needed for these.
SAML also involves other mechanisms like automatically posting forms that does not translate well to a in browser application.
In conclusion, SAML was not designed to be used for things like SPAs. It was designed for a classic, old school, thick backend server - client setup. OIDC on the other hand is a more modern protocol that fit this use case perfectly.
However, the reality is that many organizations have relied on SAML for along time and it is not unusual to see this being the only supported protocol for the existing identity provider.
Brokered authentication using Keycloak
One way to solve this dilemma is to use a broker authentication pattern.
Instead of just using OIDC or just using SAML, the SPA uses OIDC, the IdP uses SAML and we place Keycloak as a broker between to translate.
sequenceDiagram
    participant Application
    participant Keycloak SP
    participant ADFS IdP
    Application->>Keycloak SP: 1. OIDC request
    Keycloak SP->>ADFS IdP: 2. SAML request
    ADFS IdP->>Keycloak SP: 3. SAML response
    Keycloak SP->>Application: 4. OIDC response
- The SPA in the browser redirects the user with an OIDC request to Keycloak
- Keycloak receives the user and request, crafts a SAML request and send it and the user to ADFS IdP for authentication
- Ones the user is authenticated ADFS send a SAML response and user back to Keycloak.
- Keycloak receives the SAML response, interprets it and uses it to craft a OIDC response and respond to the original OIDC request from the React SPA.
Setting it up
When I prepared this, I created configuration and scripts in Vagrant to set up the a demo environment automatically. The automated setup is available here on Github. At the end of the article I have some more information on how to use it.
While walking through the configuration I will show how to configure everything in the UI interfaces as well as using the command line.
Below we will look on the four steps needed
- Setting up Keycloak to use OIDC towards React SPA
- Setting up the React demo application
- SAML integration between ADFS and Keycloak
- Configure brokering between OIDC and SAML
Setting up Keycloak to use OIDC towards React SPA
Provided you have set up your Keycloak, lets dive in and configure OIDC!
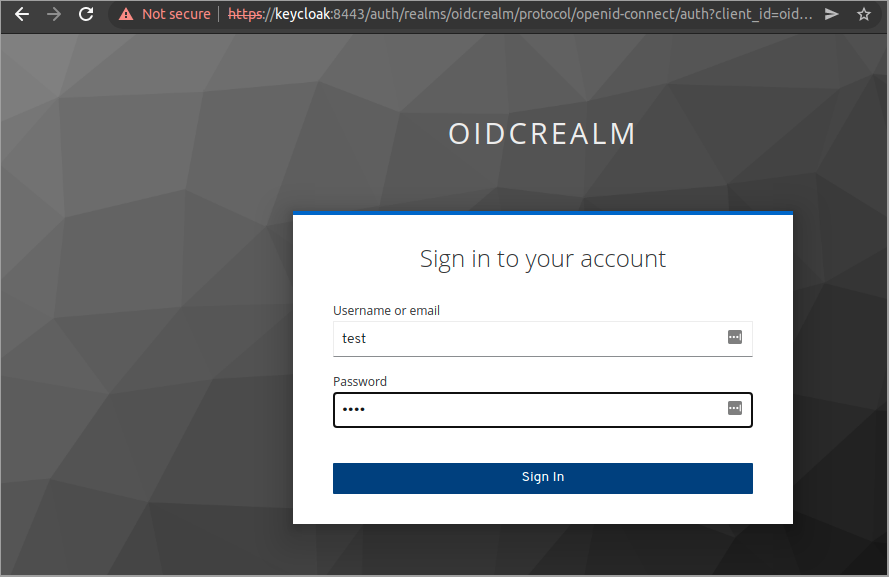
Browse to https://keycloak:8443/auth/admin/ and login as admin.
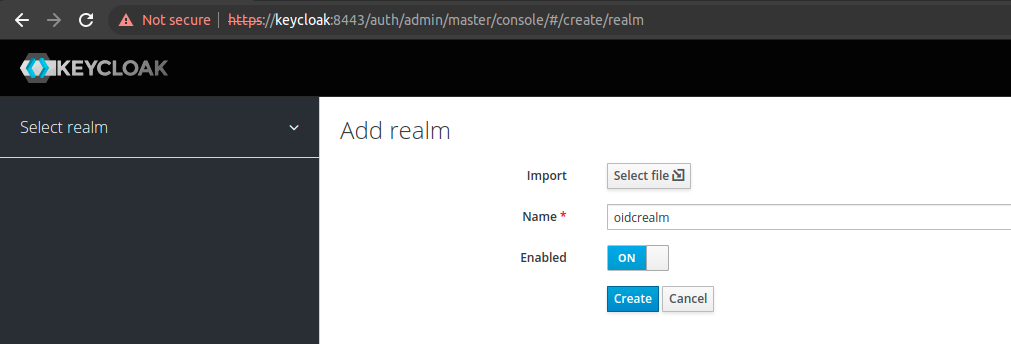
Create a realm for the OIDC integration
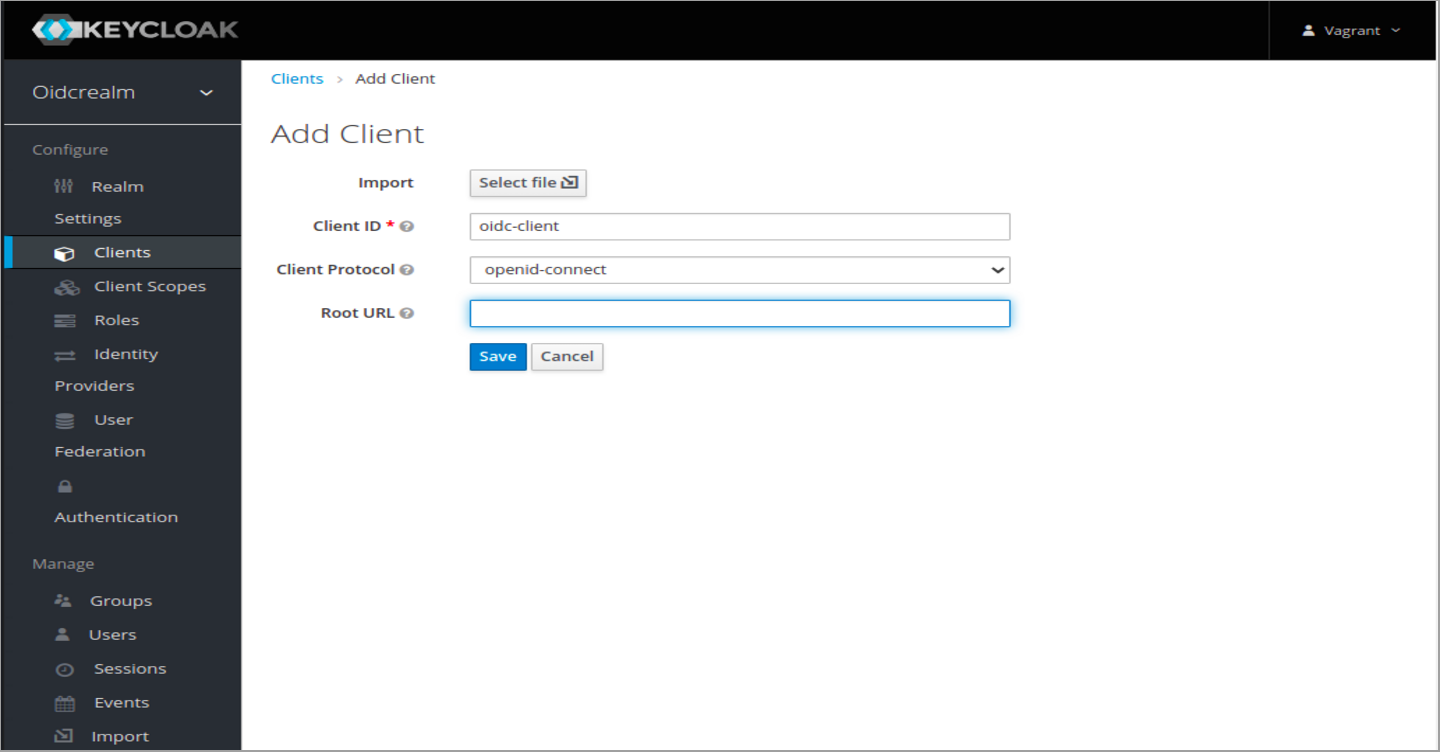
Create a client for the React SPA. On the first screen, just input a name for the client and click create.
On this next screen add a redirect URL for your SPA. In my case Im setting up a demo React app below with redirect URL "http://react:3000"
Under Web Origins, type a plus sign. Do not click the plus sign, but type a plus sign in the field. This will add all your redirect URLs in allowed origins and avoid CORS problems.
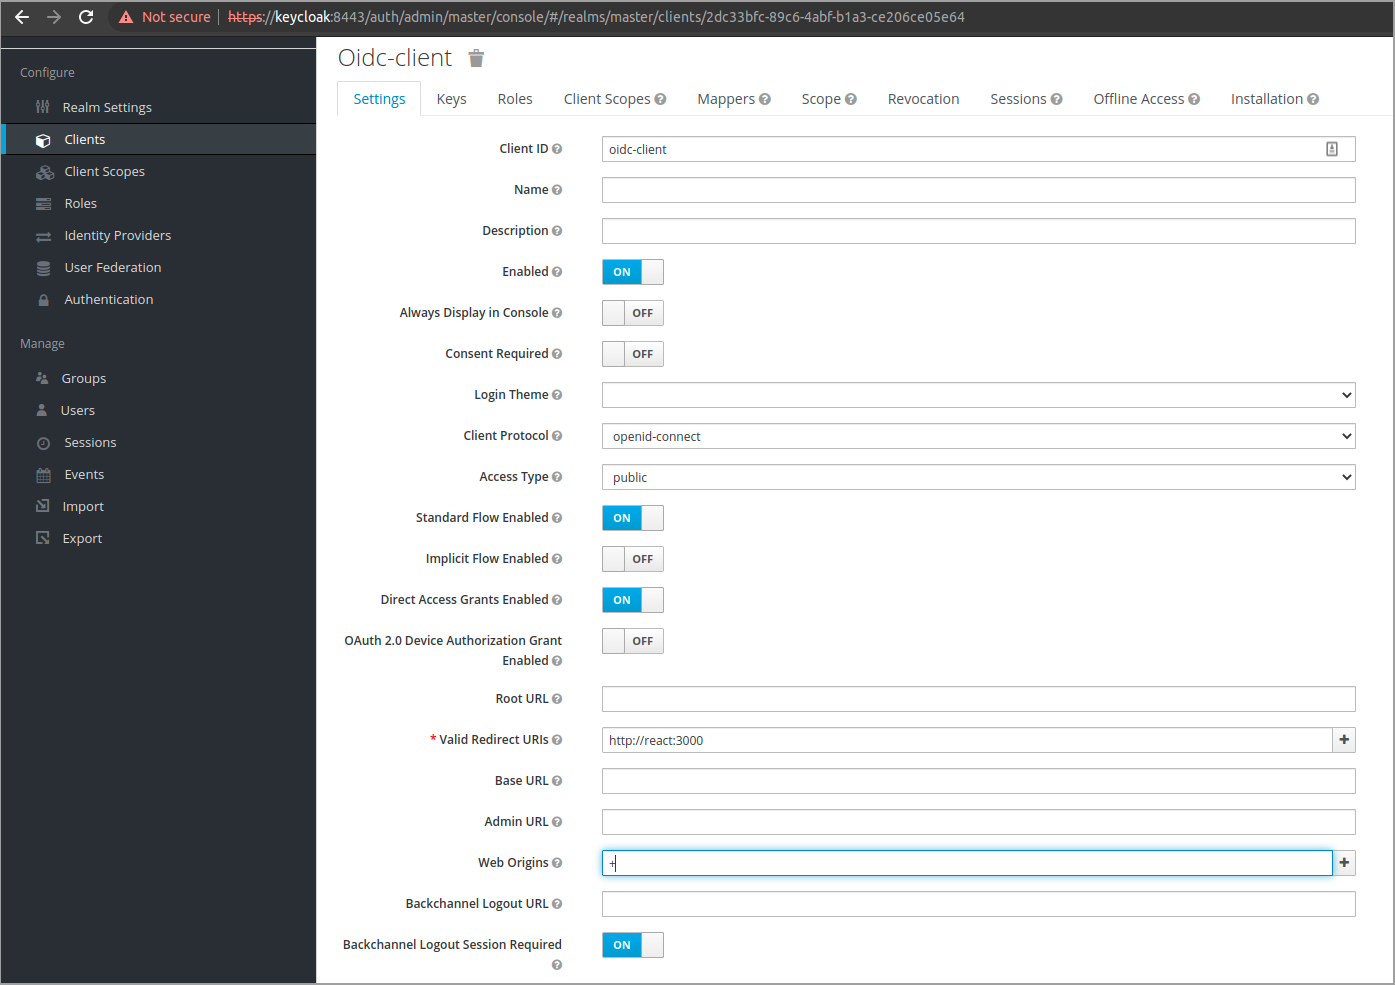
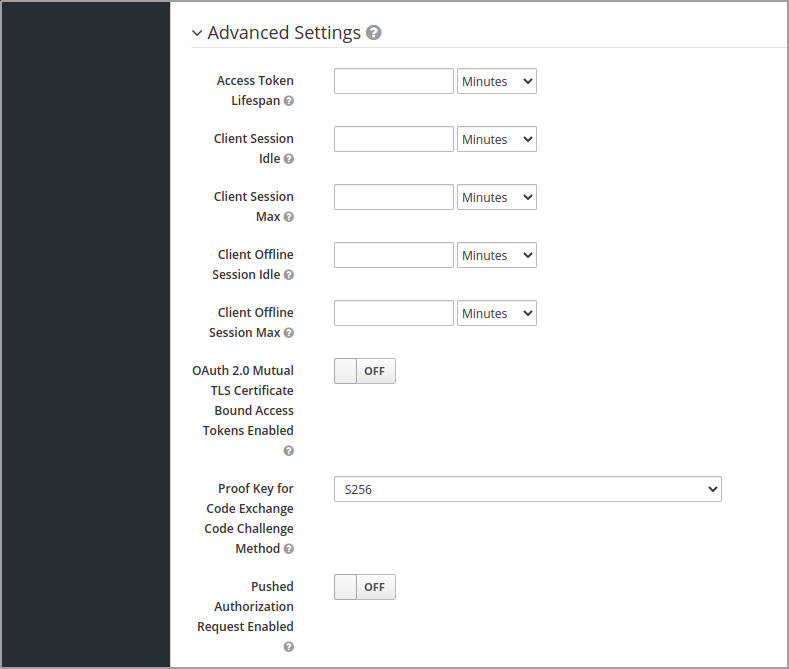
Now lets configure the client to use PKCE. This is best practice when working with SPAs and other applications that can not protect a secret key.
Make sure "Access Type" is set to public and that "Standard Flow Enabled" is set to On.
Next expand the Advanced settings and set "Proof Key for Code Exchange Code Challenge Method" to S256
To do this using the Keycloak CLI
1kcadm.sh create realms -s realm=oidcrealm -s enabled=true
2
3kcadm.sh create clients -r oidcrealm -f - << EOF
4{"clientId" : "oidc-client", "redirectUris": ["http://react:3000"], "webOrigins": ["+"], "standardFlowEnabled": true, "publicClient": true, "attributes": {"pkce.code.challenge.method":"S256"}}
5EOF
Setting up the React demo application
Now its time to configure the React application to authenticate users using OIDC. In this tutorial I'm using my own OIDC demo app. The application is available here on Github How to set up another app will vary depending on what framework you are using, but you will need to get and configure the OIDC endpoint for Keycloak. For our current setup the endpoint will be these
- authorizeEndpoint: https://keycloak:8443/auth/realms/oidcrealm/protocol/openid-connect/auth
- tokenEndpoint: https://keycloak:8443/auth/realms/oidcrealm/protocol/openid-connect/token
- logoutEndpoint: https://keycloak:8443/auth/realms/oidcrealm/protocol/openid-connect/logout
To configure the React demo app, clone the repo and run npm install.
1git clone https://github.com/rasmusson/react-oidc-pkce-demo
2cd react-oidc-pkce-demo
3npm install
Now open src/SecuredApp.js and edit the configuration in AuthService to match your endpoints, client name and redirect URI. In our case it will look like this.
1const authService = new AuthService({
2    clientId: 'oidc-client',
3    authorizeEndpoint: 'https://keycloak:8443/auth/realms/oidcrealm/protocol/openid-connect/auth',
4    tokenEndpoint: 'https://keycloak:8443/auth/realms/oidcrealm/protocol/openid-connect/token',
5    logoutEndpoint: 'https://keycloak:8443/auth/realms/oidcrealm/protocol/openid-connect/logout',
6    redirectUri: 'http://react:3000',
7    scopes: ['openid'],
8});
Next start the React app
1npm startTo test that the OIDC integration works fine, lets create a test user in Keycloak and authenticate.
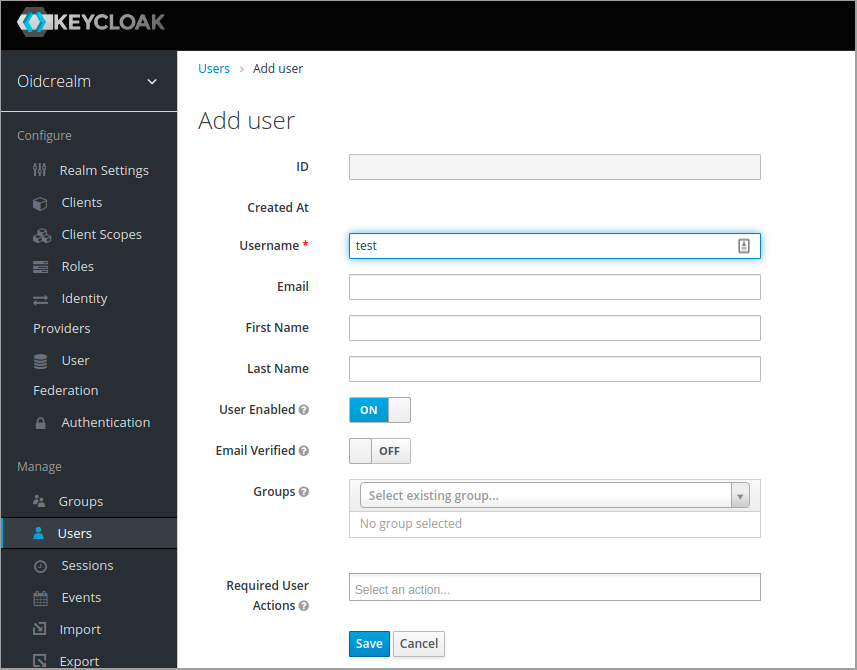
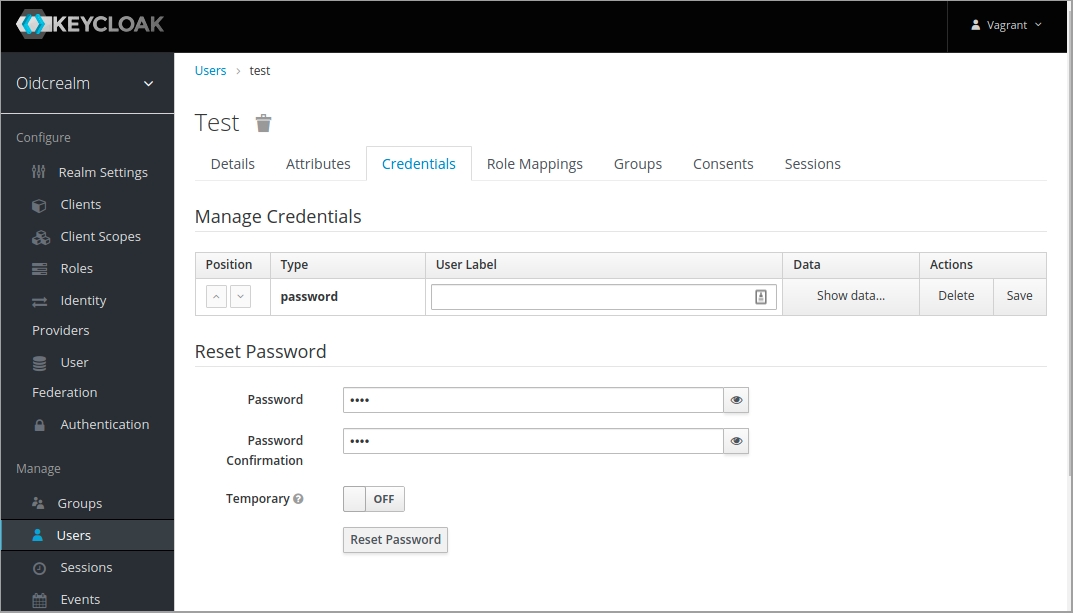
To create the test user using Keycloak CLI
1kcadm.sh create users -r oidcrealm -s username=test -s enabled=true -o --fields id,username
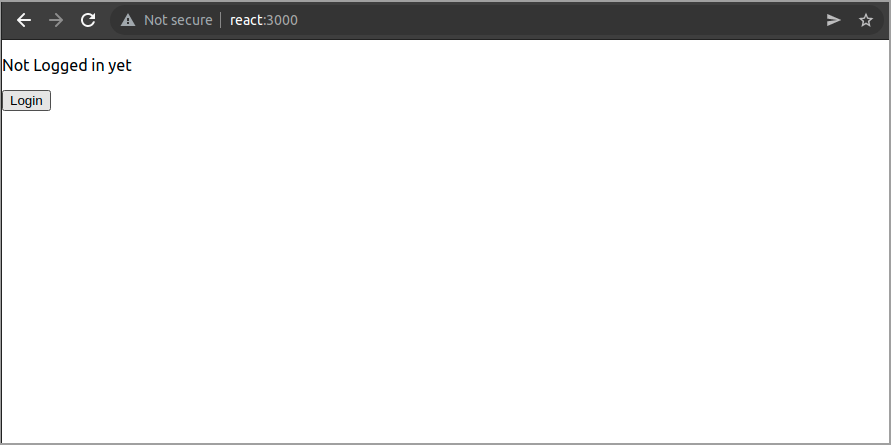
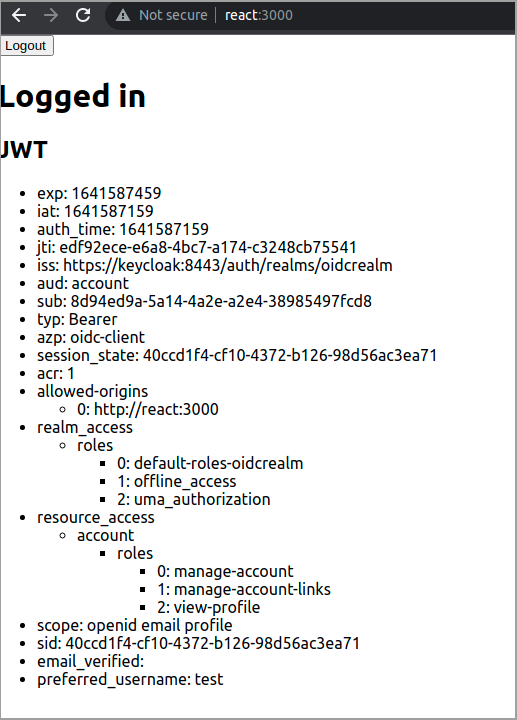
2kcadm.sh set-password -r oidcrealm --username test --new-password testBrowse to where your React app is running, in my case http://react:3000/ and click the Login button
SAML integration between ADFS and Keycloak
Next step is to set up a authentication provider in Keycloak to authenticate users against the ADFS IdP.
In Keycloak, create a new SAML authentication provider
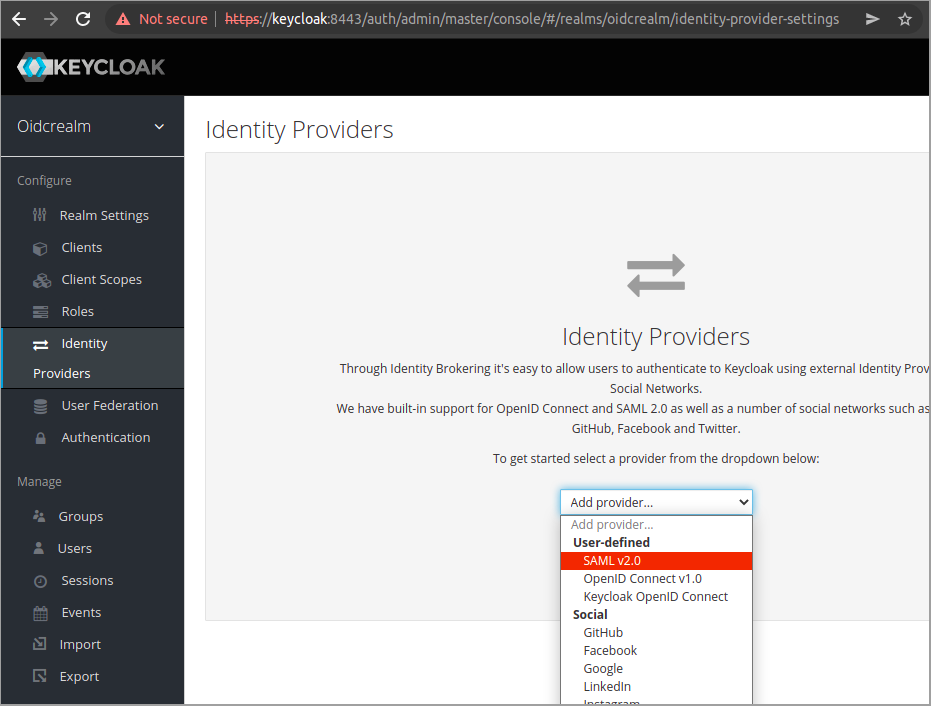
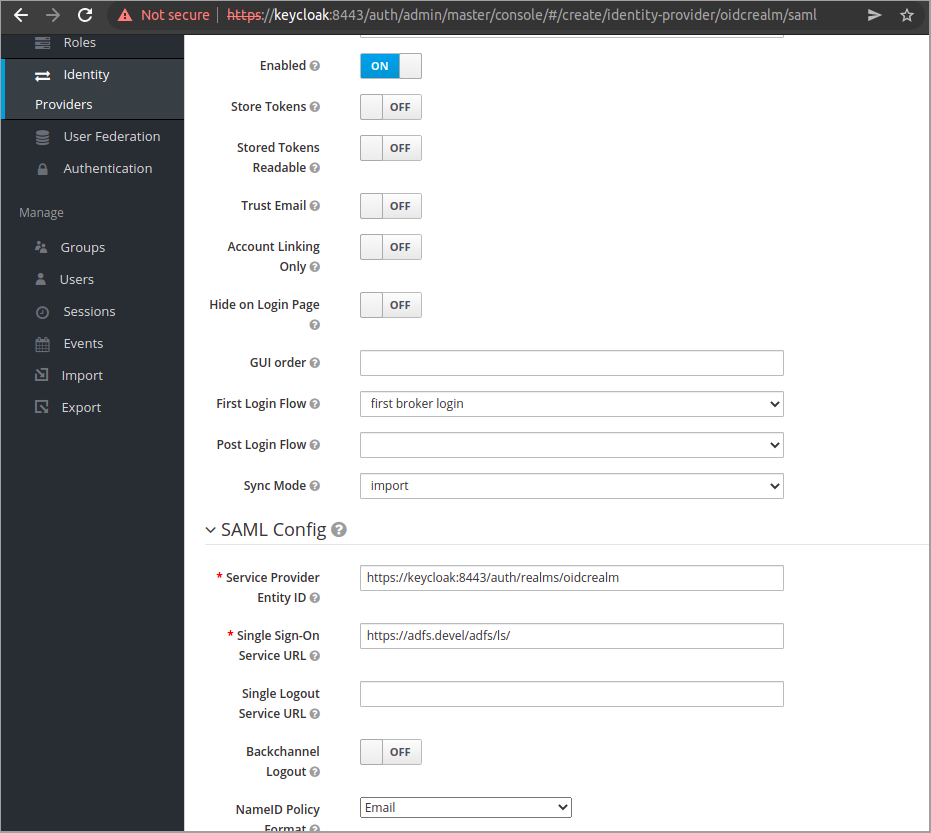
Configuration may differ in different environments. In this demo we will set the following
- Sync Mode: Import - Meaning we import the user data coming from the IdP ones, when the user is first authenticated.
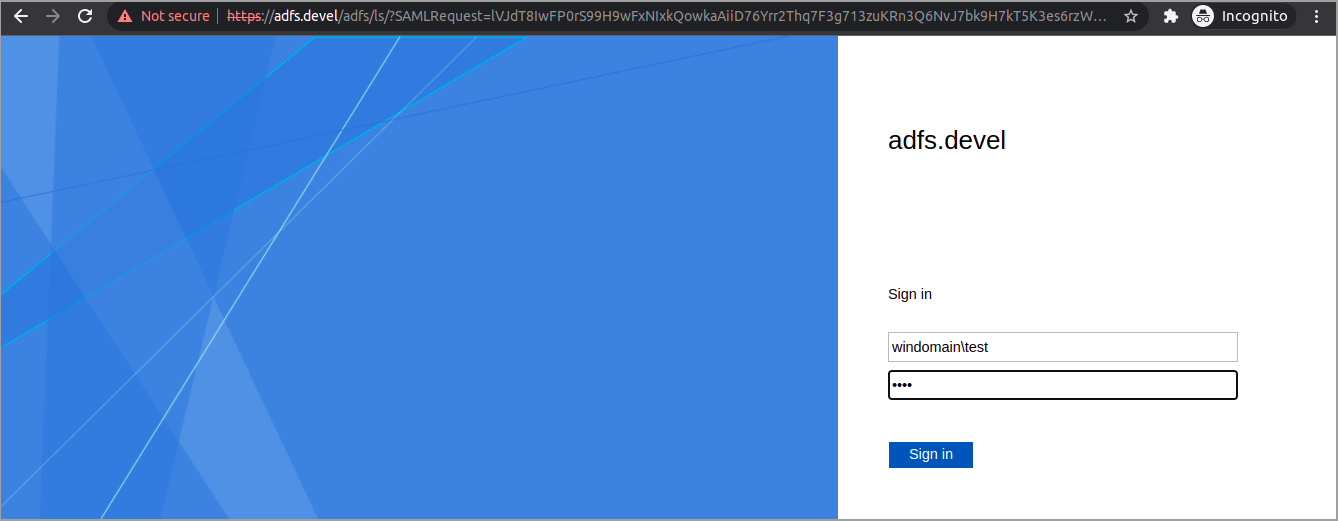
- Single Sign-On Service URL: https://adfs.devel/adfs/ls/ - Where our ADFS endpoint for SSO is.
- Single Logout Service URL: https://adfs.devel/adfs/ls/ - Where our ADFS endpoint for SLO is.
- Want AuthnRequests Signed: On - To sign authentication request and especially singing single logout requests which is mandatory by default in ADFS.
- NameID Policy Format: Email - This is how we will identify users
To configure the SAML IdP using Keycloak CLI
1kcadm.sh create identity-provider/instances -r oidcrealm -s alias=saml -s providerId=saml -s enabled=true -s config.wantAuthnRequestsSigned=true -s config.allowedClockSkew=10 -s 'config.useJwksUrl="true"' -s config.singleSignOnServiceUrl=https://adfs.devel/adfs/ls/ -s config.singleLogoutServiceUrl=https://adfs.devel/adfs/ls/ -s config.nameIDPolicyFormat=urn:oasis:names:tc:SAML:1.1:nameid-format:emailAddress -s config.signatureAlgorithm=RSA_SHA256Configure Keycloak as relaying party in ADFS
When setting up Keycloak as a SP in ADFS, we need to import Metadata. The metadata contains connection and communication information that ADFS needs.
First lets download the metadata from Keycloak. At the ADFS server, browse to https://keycloak:8443/auth/realms/oidcrealm/broker/saml/endpoint/descriptor. Click through the HTTPS warnings and download the file.
Open up ADFS administration, and add a relying party. Choose Claims aware. Use the option "Import data about the relying party from a file" and browse to you file.
Normally the metadata is simplest imported by using the option "Import data about the relying party published online or on a local network" to let ADFS fetch the metadata directly from Keycloak. This requires the TLS trust is setup correctly. I have not bothered to do that for this demo so I use this method instead.
Set a name, for example Keycloak
Next we set which users are allowed to authenticate thought the integration. As this is a demo, we make it simple and set it to everyone. Select "Permit everyone"
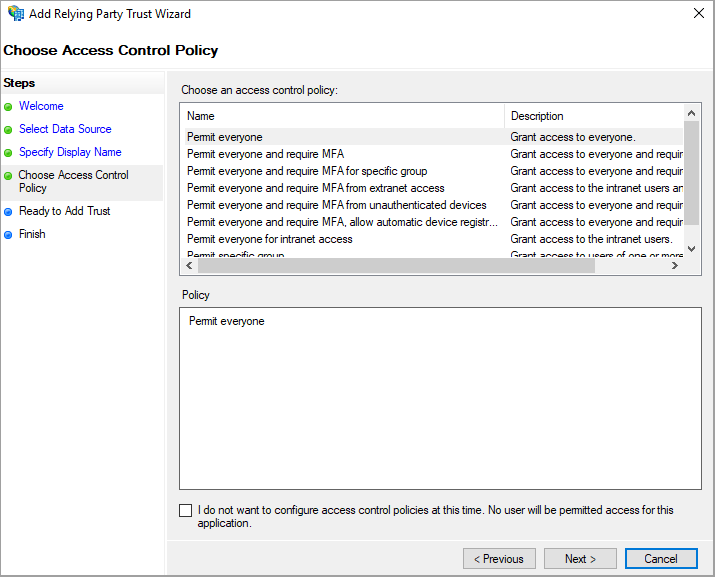
Then click next, next and finish
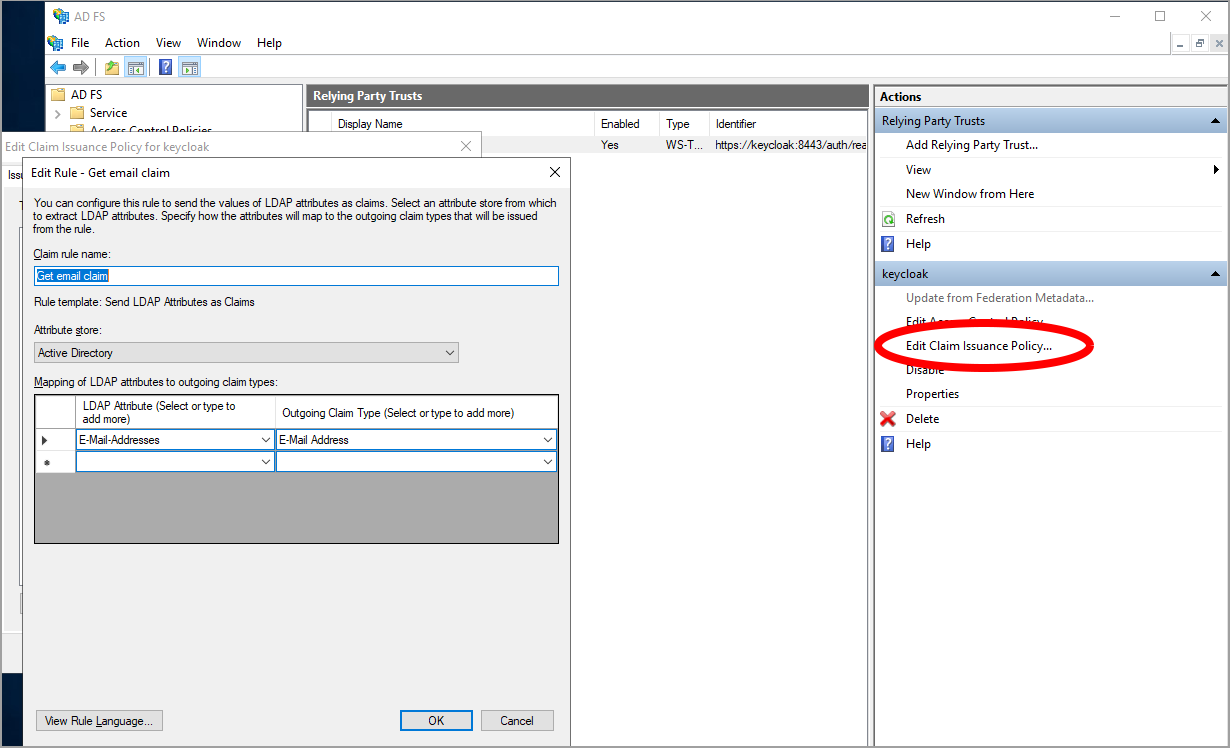
After you finish, the dialog "Edit Claims Issuance Policy for Keycloak" should open. Here we configure what information will be sent to Keycloak together with the user when it has been authenticated. In Keycloak we configured the user to be identified by email, so now we must configure ADFS to send the email address of the authenticated user.
First we create a rule to get a the email as a claim.
Select "Send LDAP Attributes as Claims". Set a name for the issuance rule, select Active Directory as store. Under LDAP attribute choose "Email addresses" and set "Email address" as Outgoing claim type
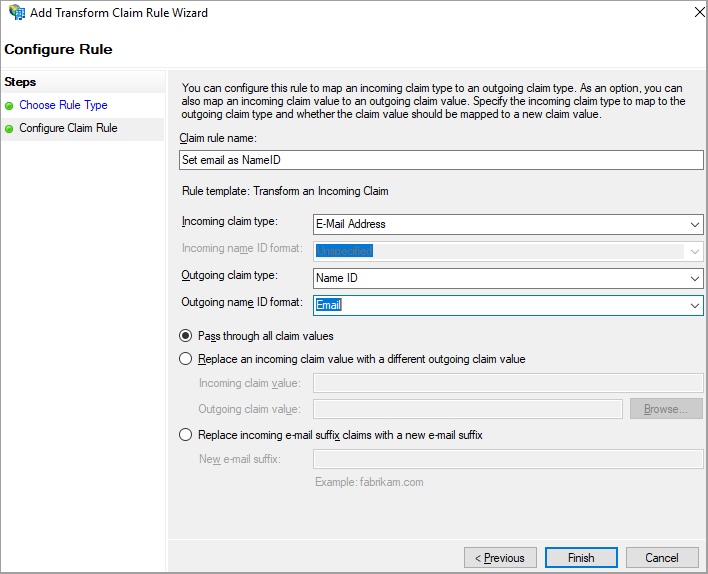
Next, we create a rule to transform and set the email claim as NameID in the SAML response. Select "Transform an incoming claim"
As "Incoming Claim type" set email address and as "Outgoing Claim type" set Name ID and Email as "Outgoing name ID format"
To configure the Keycloak relying party on ADFS using PowerShell, first disable HTTPS verification if you have not yet set up TLS trust between Keycloak and ADFS
1[System.Net.ServicePointManager]::ServerCertificateValidationCallback = {$true}Create and configure relying party
1Add-ADFSRelyingPartyTrust -Name 'keycloak' -MetadataURL 'https://keycloak:8443/auth/realms/oidcrealm/broker/saml/endpoint/descriptor' -IssuanceAuthorizationRules @'
2@RuleTemplate = "AllowAllAuthzRule"
3 => issue(Type = "http://schemas.microsoft.com/authorization/claims/permit", Value = "true");
4'@ -IssuanceTransformRules @'
5@RuleTemplate = "LdapClaims"
6@RuleName = "Email Attribute"
7c:[Type == "http://schemas.microsoft.com/ws/2008/06/identity/claims/windowsaccountname", Issuer == "AD AUTHORITY"] => issue(store = "Active Directory", types = ("http://schemas.xmlsoap.org/ws/2005/05/identity/claims/emailaddress"), query = ";mail;{0}", param = c.Value);
8
9@RuleTemplate = "MapClaims"
10@RuleName = "Email ad nameid"
11c:[Type == "http://schemas.xmlsoap.org/ws/2005/05/identity/claims/emailaddress"] => issue(Type ="http://schemas.xmlsoap.org/ws/2005/05/identity/claims/nameidentifier", Issuer = c.Issuer, OriginalIssuer = c.OriginalIssuer, Value = c.Value, ValueType = c.ValueType, Properties["http://schemas.xmlsoap.org/ws/2005/05/identity/claimproperties/format"] = "urn:oasis:names:tc:SAML:1.1:nameid-format:emailAddress");
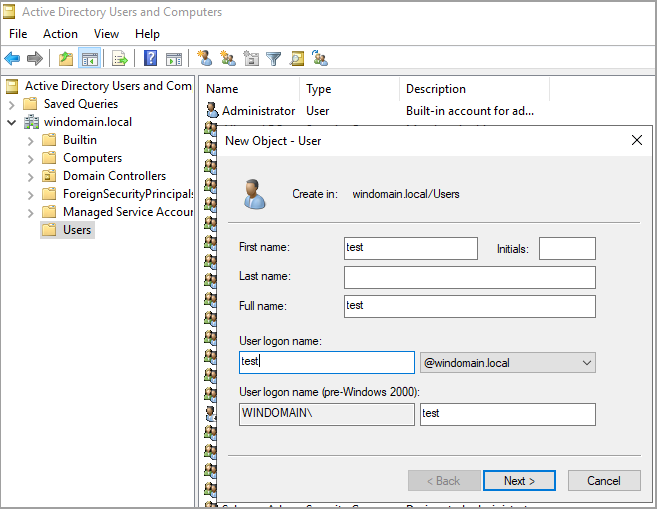
12'@And while we are in the Windows server, lets create a test user in AD to test the final setup when we are done.
Open the Active Directory Users and Computers tool and create a new user. After creating the user, make sure to open the user properties and add an email address.
To add the user using PowerShell, first disable complex passwords to let use a simple password for testing
1secedit /export /cfg C:\secconfig.cfg
2  (gc C:\secconfig.cfg).replace("PasswordComplexity = 1", "PasswordComplexity = 0").replace("MinimumPasswordLength = 7", "MinimumPasswordLength = 0") | Out-File C:\secconfig.cfg
3  secedit /configure /db C:\Windows\security\local.sdb /cfg C:\secconfig.cfg /areas SECURITYPOLICY
4  rm -force C:\secconfig.cfg -confirm:$false
Now lets create the user
1Import-Module ActiveDirectory
2New-ADUser -SamAccountName test2 -GivenName Test -Surname User -Name "Test User" -Email "test@test.com"`
3           -Path "CN=Users,DC=windomain,DC=local" `
4           -AccountPassword (ConvertTo-SecureString 'test' -AsPlainText -Force) -Enabled $true
Configure brokering between OIDC and SAML
To make use of the configured SAML IdP to authenticate the user from the React SPA, we need to configure two things in Keycloak.
- Identity Provider Redirector - To direct the user to ADFS IdP
- Authentication flow - To handle the SAML result from ADFS
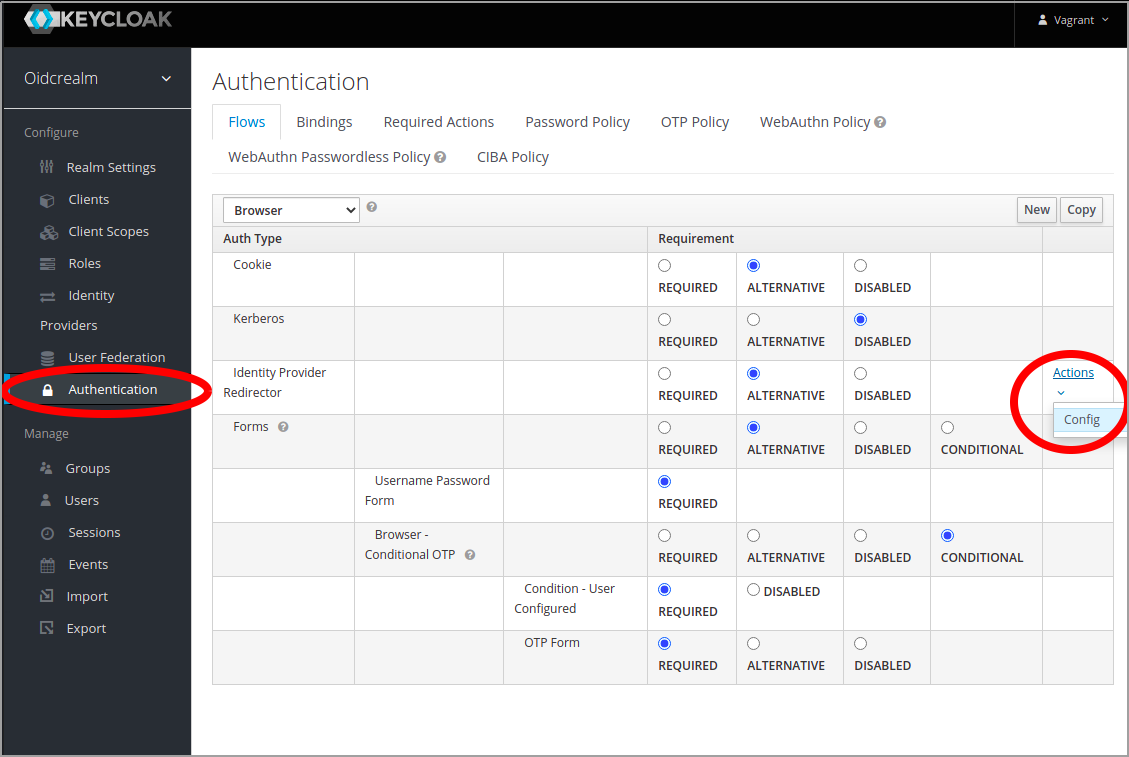
Configure the redirector
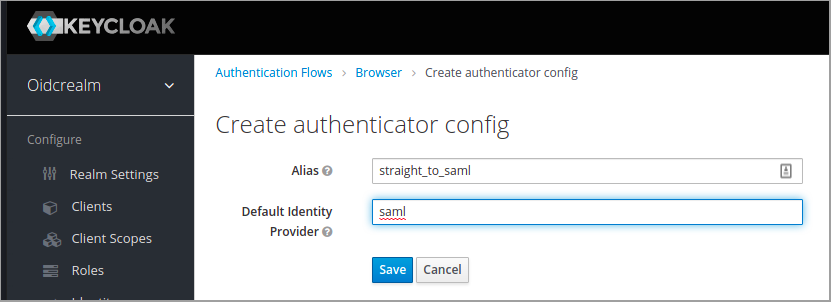
Configure the redirector under Authentication in the menu in the Keycloak web ui. Set an alias and under Default Identity Provider, set the name chosen when creating the SAML authentication provider in earlier steps.
Transparent brokering
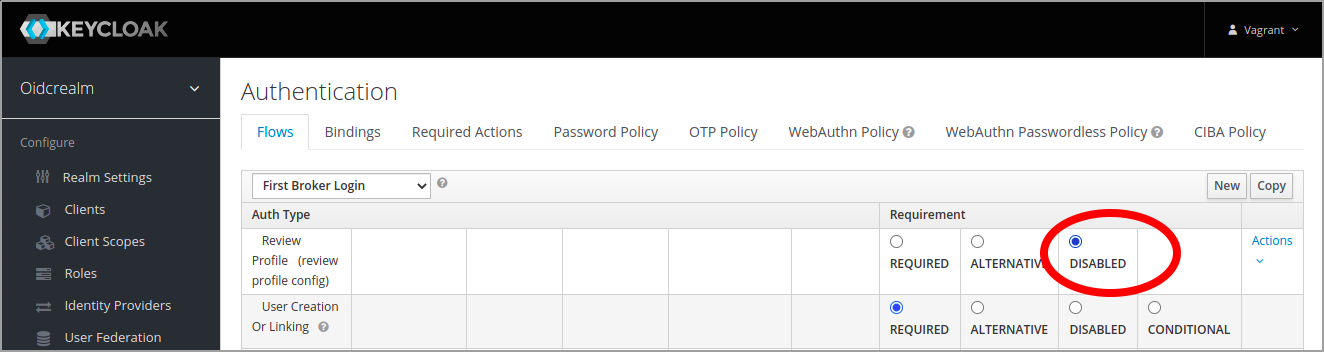
The default behavior of Keycloak in brokering mode is that the a new user is asked to update their user profile in Keycloak a first authentication. If you want to have the brokering in Keycloak to be totally transparent, this can be disabled in the "First broker login" authentication flow.
Under Authentication, select "First broker login" flow and click disable for the first step named "Review Profile"
To configure the IdP redirection and disabling of the profile review in Keycloak CLI
1idpRedirector=$(kcadm.sh get /authentication/flows/browser/executions -r oidcrealm | jq -r '.[] | select(.providerId == "identity-provider-redirector").id')
2kcadm.sh create /authentication/executions/$idpRedirector/config -r oidcrealm -s config.defaultProvider=saml -s alias=straight_to_saml
3
4reviewProfileExecution=$(kcadm.sh get /authentication/flows/first%20broker%20login/executions -r oidcrealm | jq -r '.[] | (select(.alias == "review profile config") | .requirement) |= "DISABLED" | select(.alias == "review profile config")')
5kcadm.sh update authentication/flows/first%20broker%20login/executions -r oidcrealm -f - << EOF
6$reviewProfileExecution
7EOFLets test it
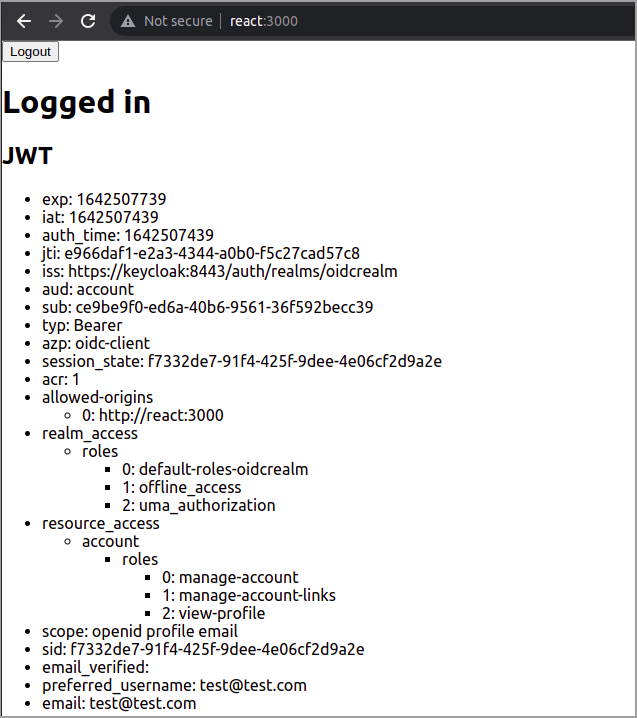
Browse to the React test applications and click Login
Fully automated demo
To make it easy to try this out and play around, I have published my fully Automated demo of this here Github. The demo is based on vagrant, spinning up different virtual machines in virtual box for ADFS, Keycloak and the React app.
To start the demo first install the prerequisites listed in the GitHub page. Then spin everything up
1vagrant up adfs keycloak reactGo grab lunch. It takes some time =)